Hi
Answer Error : automatic collection of configuration data failed
The following steps must be performed before installation
- Open Windows Explorer.
- Navigate to C:\Labfiles]Lync2013\Setup\amd64.
- Open the Setup application.
- Choose the desired location and click Install.
- Accept the licence agreement and click OK.
- Once the copying is complete, the Lync Server Deployment Wizard opens up. In the wizard, choose Prepare Active Directory. During deployment certain
steps are to be executed to process extends the schema for this Front End Server. In the first step, that is Prepare Schema, click Run.
- Click Next. Once the step is successfully completed, finish and close the window.
- Now we can verify the replication of the schema partition. Next, we prepare the current forest. This step creates the necessary global settings and objects as well as the universal service and administration
groups. In step 3, click Run. Click Next. Specify the domain where the universal groups will be created, and click Next.When the step is successfully completed, click finish and
close the window.
-
After you have verified the replication of the global catalog, the next step is to prepare the current domain. This step creates the necessary access control entries (ACEs) on the domain root. Begin by clicking Run button
in step 5. Click Next. When the step is successfully completed, click finish and close the window.
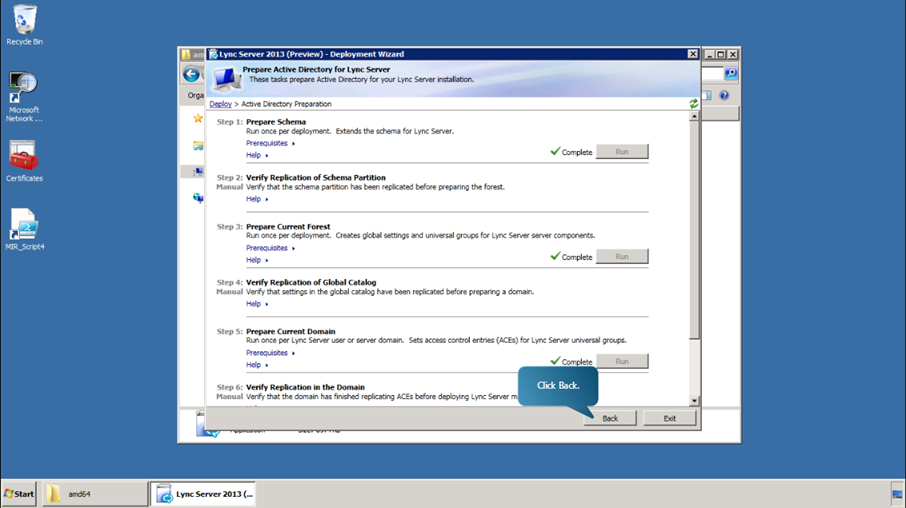
- Once all the steps are completed, navigate back to the Welcome screen of the Deployment Wizard.
-
Clicking Install Administrative Tools installs the Administrative Tools, including Lync Server Control Panel and Lync Server Topology Builder, to the current system.
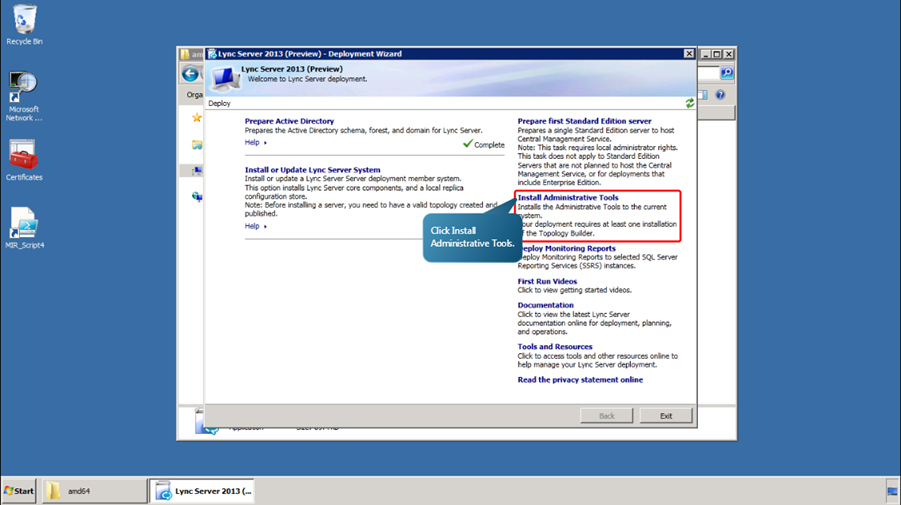
- Once this completes, we have successfully prepared the Active Directory Domain Services (AD DS) for the new Lync and installed the Lync Topology Builder.
In the next procedure, we will see how to use Topology Builder to add an additional site; how to define Lync Server Enterprise Edition Front End Pools; and how to define Front End Servers for those pools. We will also see how
to define other Lync Server components and configurations.
-
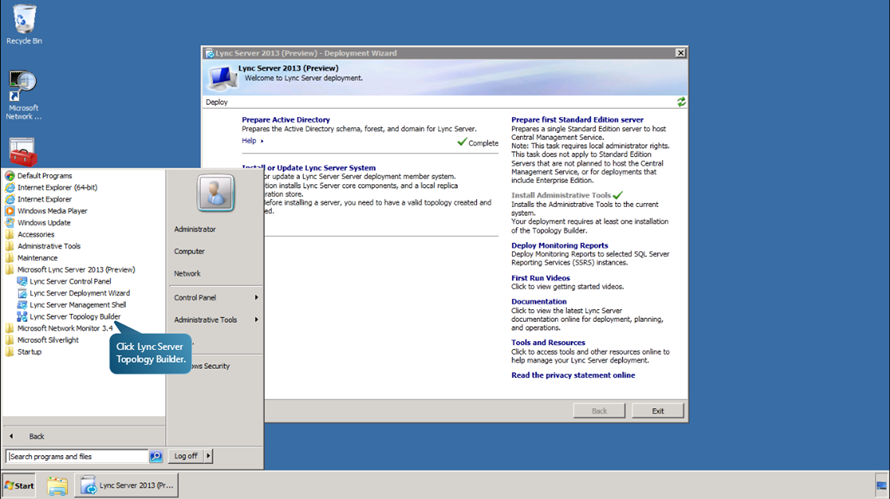
We begin by launching the Topology Builder and download the existing legacy topology from the front end server. Go
to Start->All Programs->Microsoft Lync Server 2013 (Preview)->Lync Server Topology Builder.
-
Select the option Download
Topology from existing deployment. This will retrieve a copy of the current topology from the Central Management store. Then click OK.
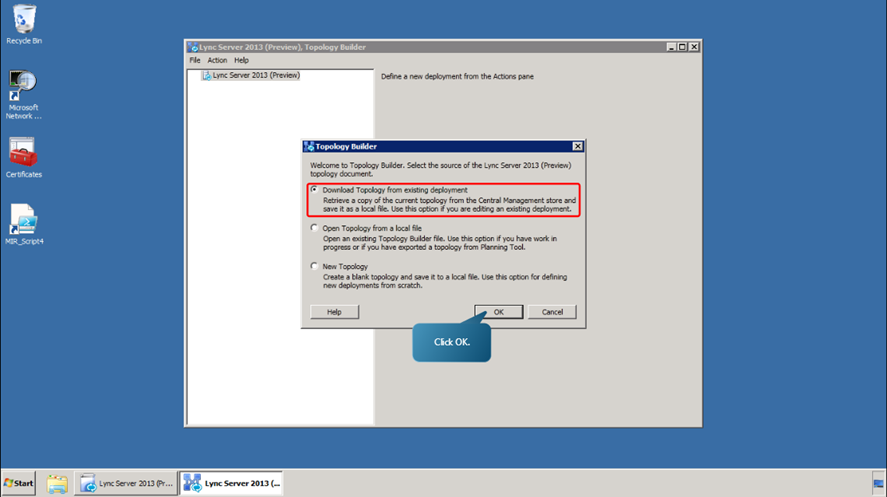
- Now save this copy as a local file, (We used C:\LabFiles\OnPremTopology).
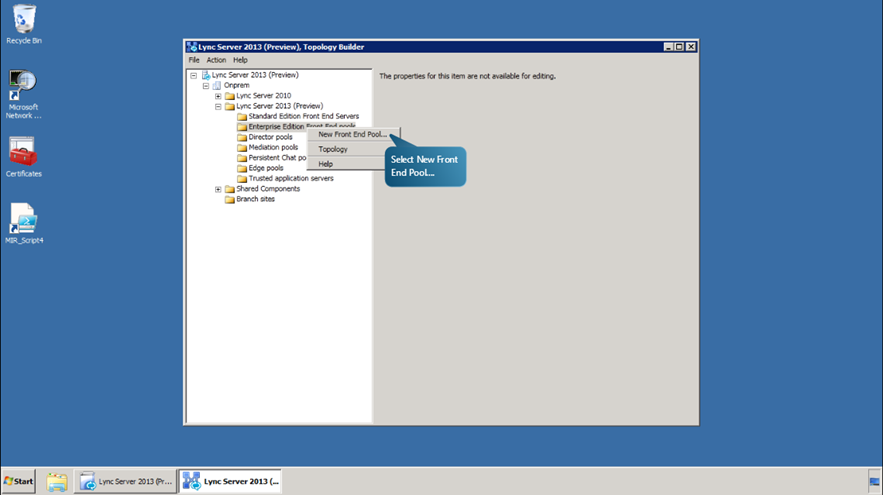
- Now we define the Enterprise Edition Front End Pool for the Redmond site by creating a Lync 2013 Enterprise Edition Pool with two Front End Servers and then configuring the necessary components. In the
topology builder window, expand Lync Server 2013(Preview)->OnPrem-> Lync Server 2013(Preview)
-
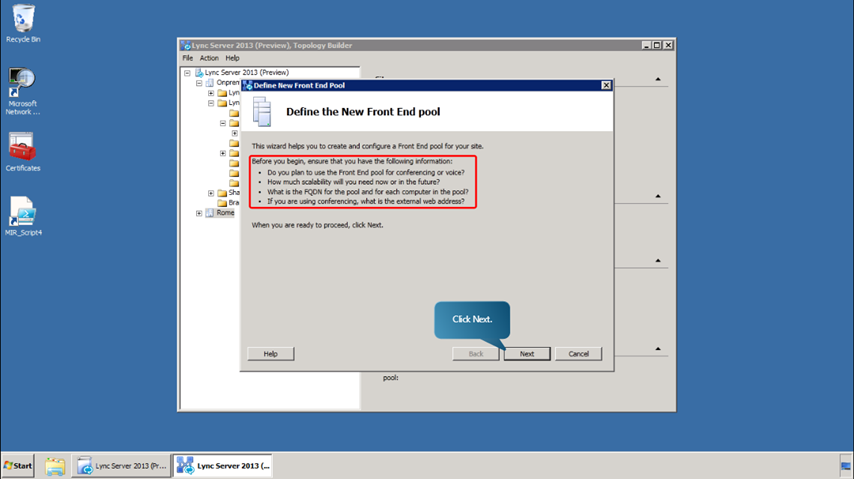
Right Click, Enterprise Edition Front End Pool and select New Front End Pool.
-
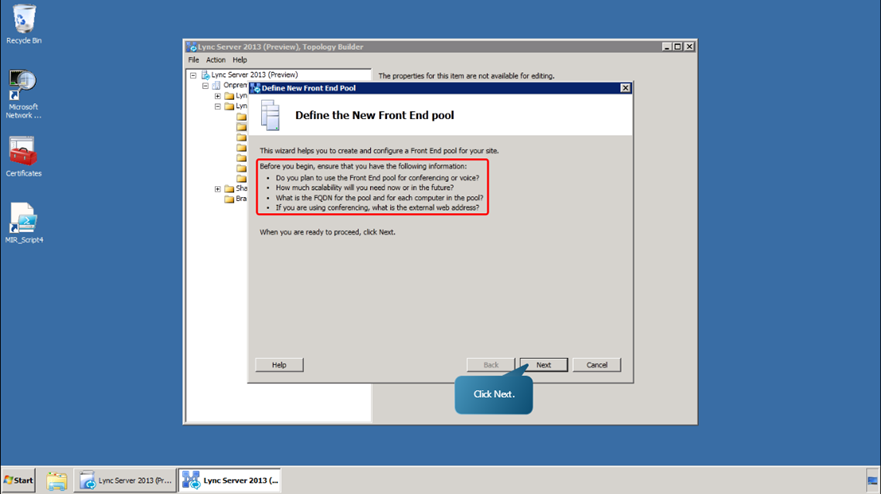
Make sure that you have all the information listed on the screen and click Next.
- In the Pool FQDN box, type in redpool.onprem.local and click next.
-
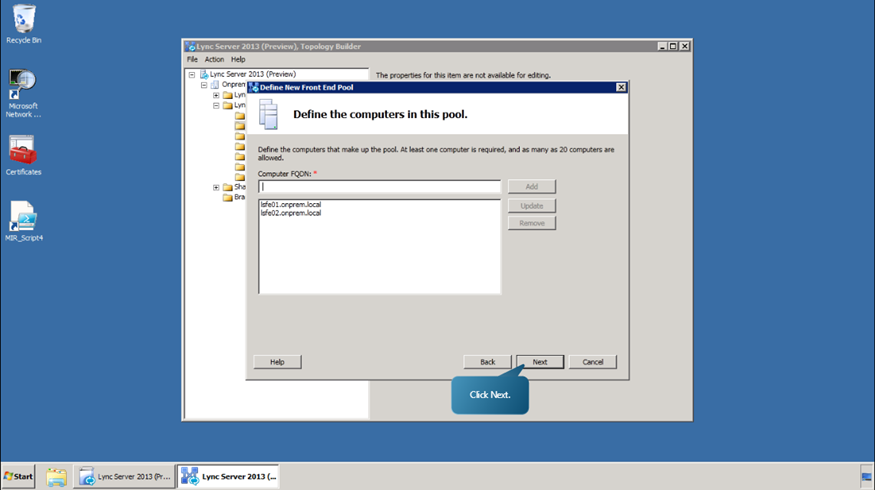
Next, define the computers that will make up the pool and click Next button.
- Select all the additional features that you want this new Front End pool to handle. (We have chosen Conferencing, Dial In(PSTN) conferencing and Enterprise Voice). Click Next to
continue.
-
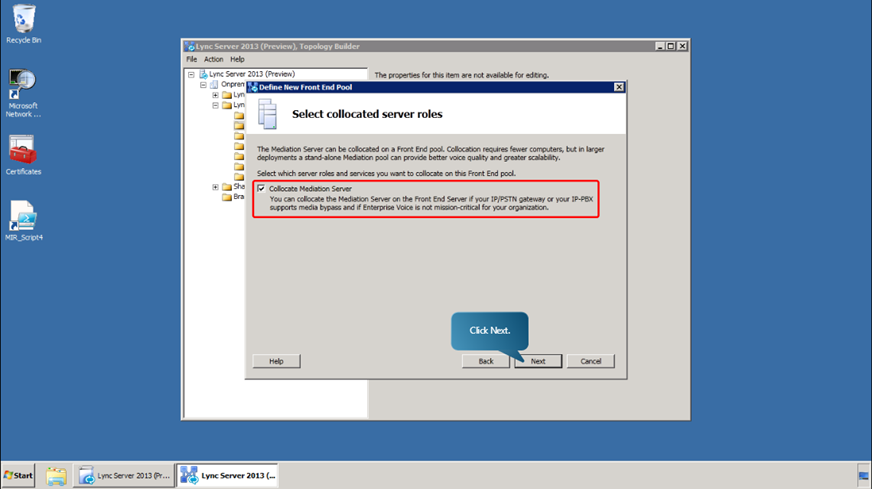
Specify which server roles and services you want to collocate on this Front End pool and click Next.
- Deselect the Enable an edge pool checkbox and click Next.
-
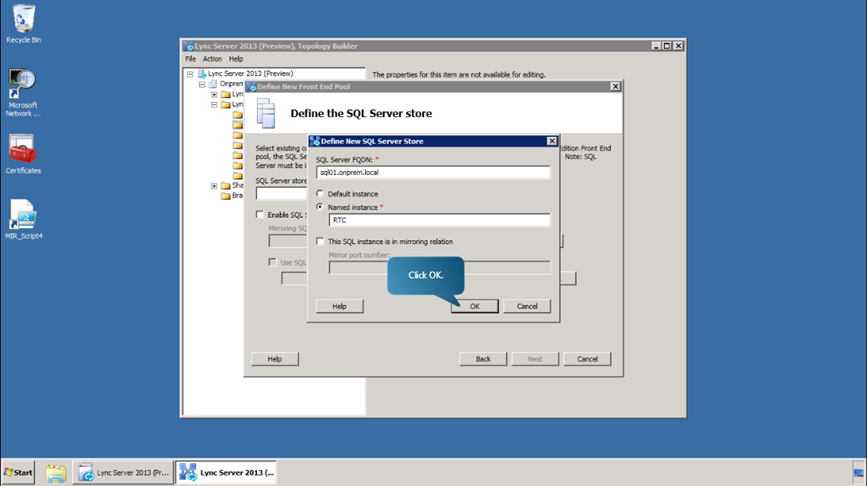
Next, define a new SQL Server instance to store user information by clicking on New. In the subsequent window, fill in the fields as shown in the figure, and click OKand Next.
-
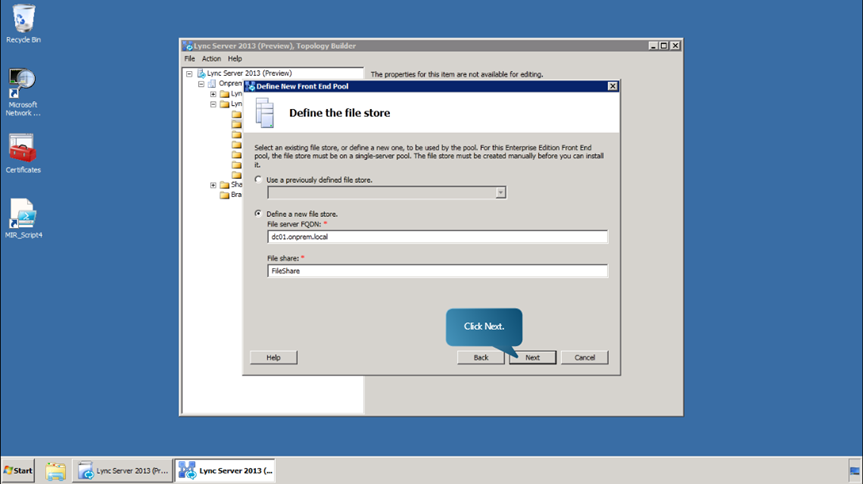
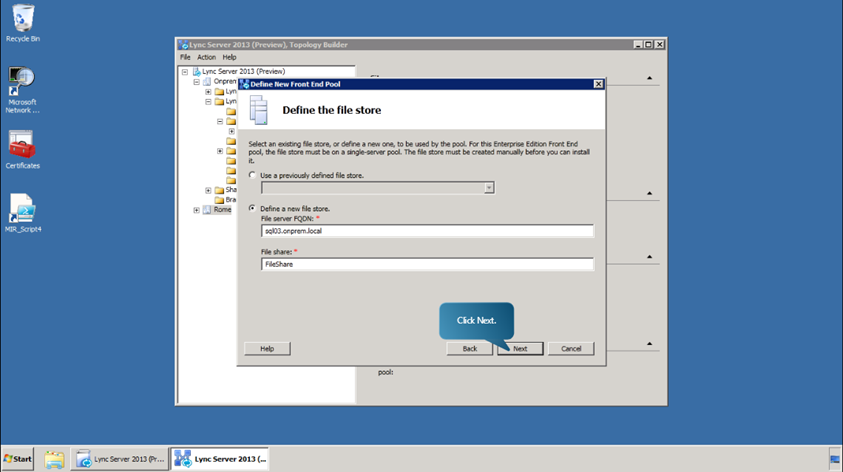
Now, we define a new file store. In the window, select the option Define a New File Store, fill in the fields as shown in figure and click Next.
- Specify the web service url. (Weve used redext826.lyncignite.biz)
-
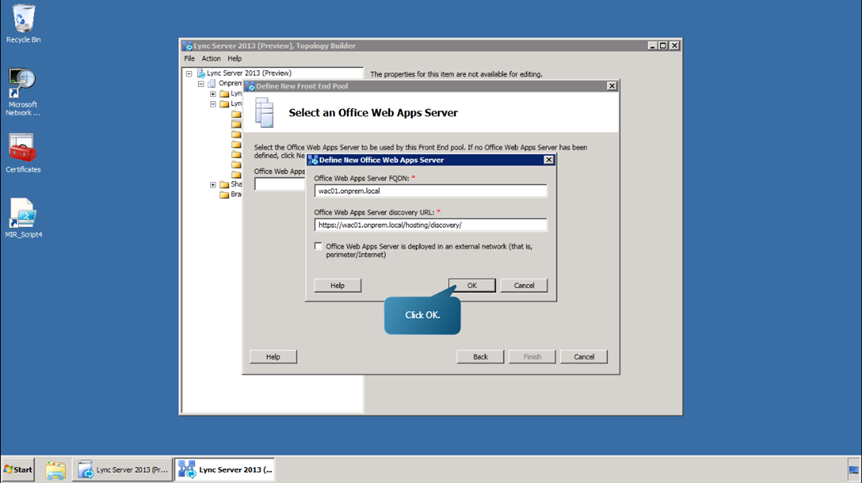
Define a new Office Web Apps Server to be used by this Front End pool. Begin by clicking New. Use the pre-populated discovery URL as well as the default settings in the window, and click OK.
- Finally click Finish.
Next, we define the Enterprise Edition Front End pool for Rome, the site to be added, using Topology Builder.
- In the topology builder, right click on Lync Server 2013 (Preview)
-
Select New Central Site. Type the site name and description and click Next.

- Provide the additional details and click next.
-
Click Finish.
-
Next, define the New Front End pool for the added site. .
- Define pool FQDN and click Next.
- Add the computers to the pool and click Next.
- Choose the necessart additional features as before and click next.
- Verify that Collocate Mediation Server is selected and click Next.
-
Enable the option and click next.

-
Define the new SQL Server store.

-
Click Next and define the File Store.
- Specify the Web Services URL. (We have used romeext826.lyncignite.biz)
- Finally click Finish.
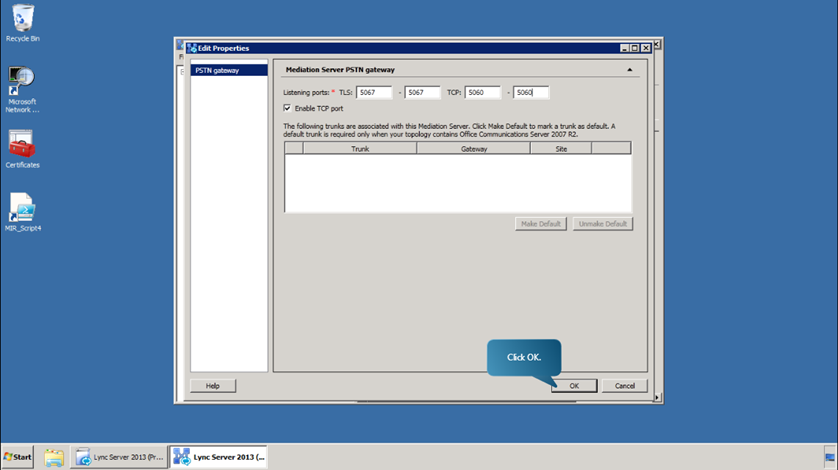
- Now, edit the on-premises Mediation pool default settings to use port 5060. Expand Mediation Pools, right click on redpool.onprem.local and select edit properties.
-
Enable the TCP Port and define it as 5060. Click OK.
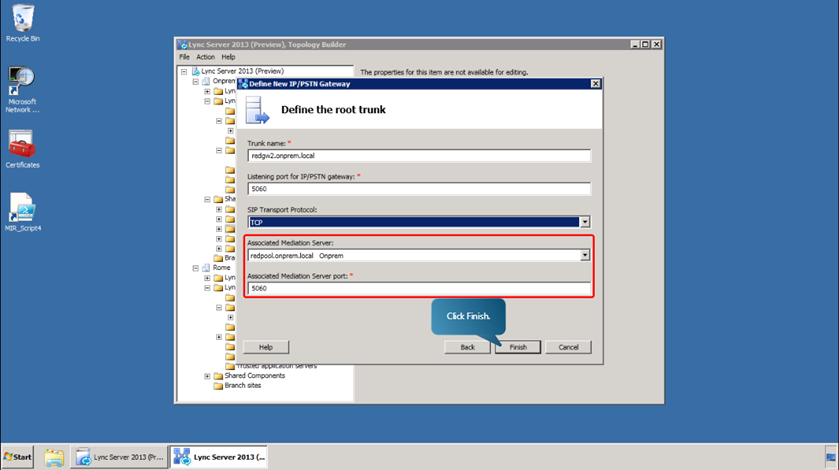
- Now, we will configure a PSTN Gateway for the Redmond pool that will resolve to a PSTN emulator on the domain controller, and then configure its listening ports. Expand Shared Components. Right click on
PSTN gateways and choose New IP/PSTN Gateway.
- Define the FQDN (redgw2.onprem.local) and click Next.
- Enable IPv4 option and Use all configured IP adresses option and click Next.
-
Define the root trunk as shown in the figure and click Finish.
- Next, edit the default settings of the Rome Mediation pool to use port 5060 just as we did before.
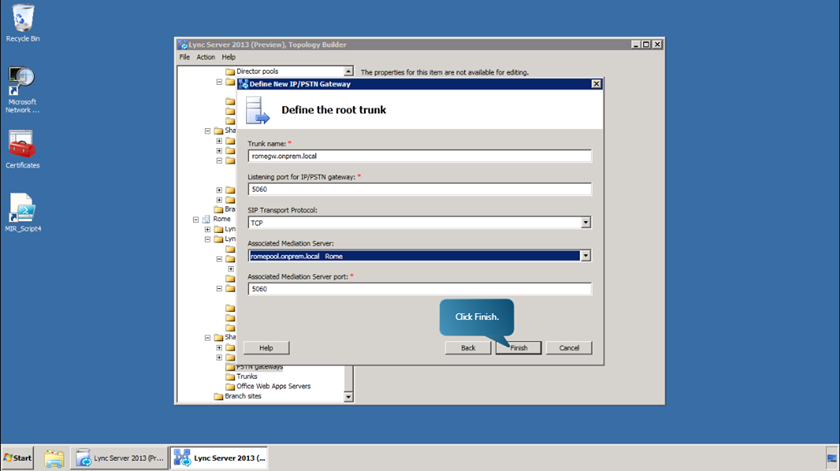
- Finally, we configure a PSTN gateway for the Rome pool that will resolve to a PSTN emulator on the domain controller and then configure its listening ports. Right click on PSTN Gateways and select New
IP/PStN gateway. Define the FQDN (romegw.onprem.local) click Next.
- Choose enable IPV4 and Use all Configured IP Addresses options and click Next.
-
Fill in the root trunk as in figure and click Finish.
We will now see how to prepare the topology for the new Lync by creating the necessary Domain Name System (DNS) records and the steps required to publish and enable the topology.
We shall now create the DNS A records for Session Initiation Protocol (SIP) in the Assigned Child Domain DNS zone. Specifically, lets create the SIP DNS records for the Redmond and Rome sites that are required for DNS load
balancing.
-
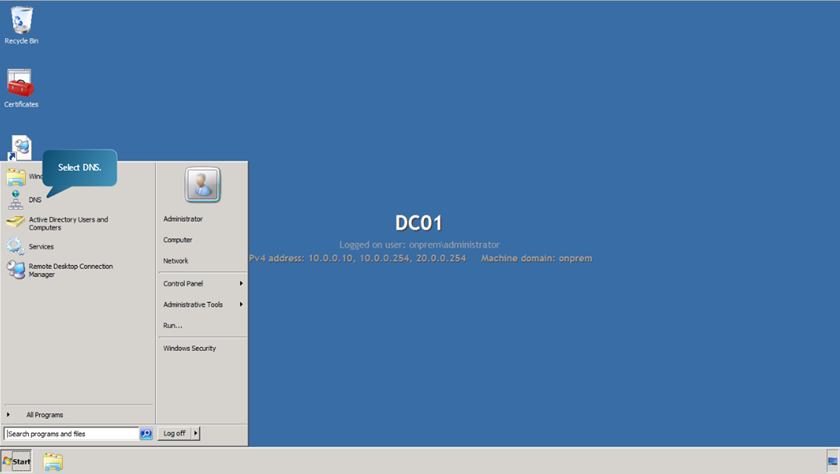
We begin by selecting the DNS from the start menu from the domain controller.
-
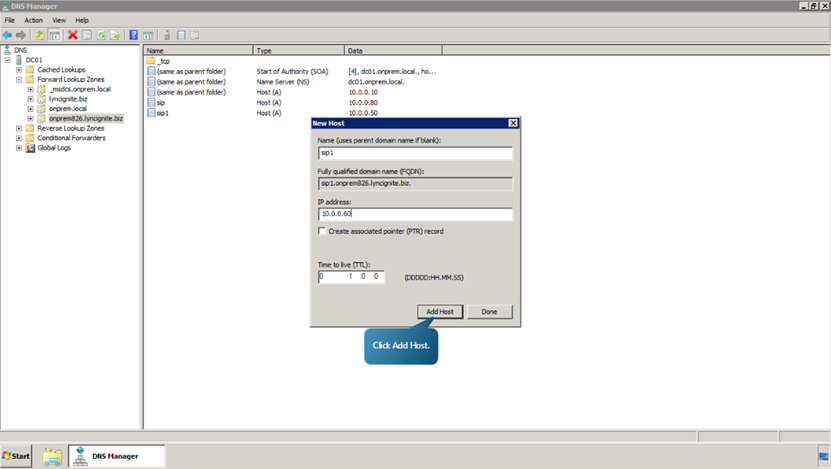
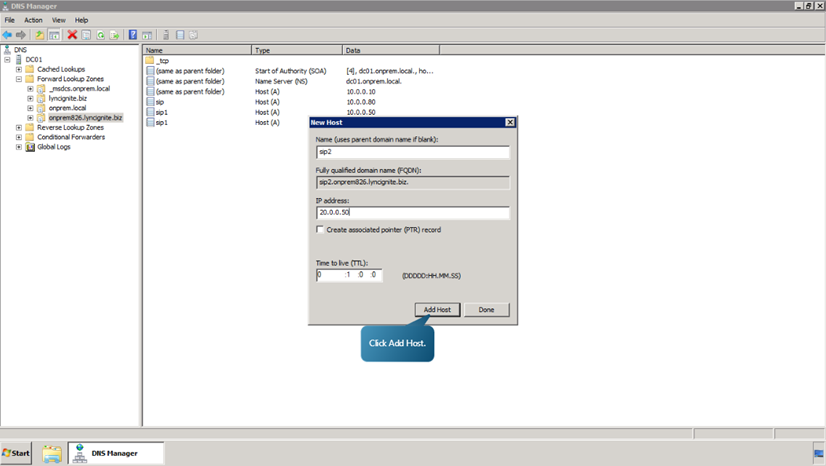
In the forward lookup zones tab, right click on onprem826.lyncignite.biz.Select New Host (A or AAA).

-
Add a host with parameters as given in the following figure.

-
Click Ok. Now lets add some more hosts. The details of the hosts are given below.
Now, we will see how to create the DNS A records for your organizations DNS zone.
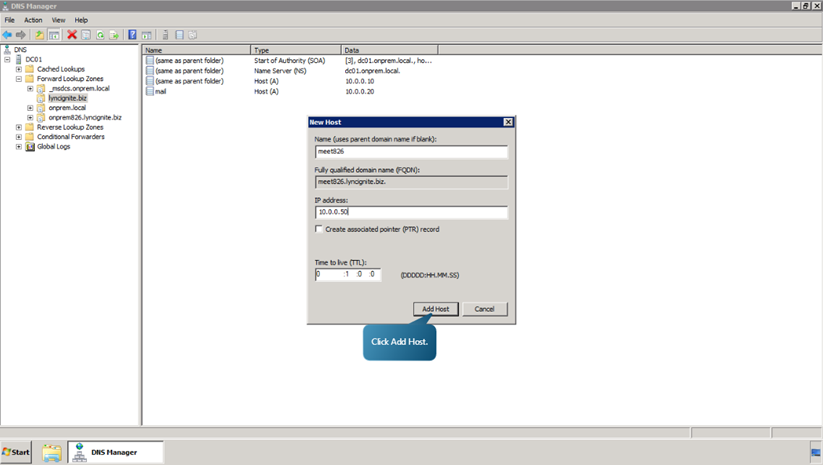
- In the forward lookup zones tab, right click on lyncignite.biz.Select New Host (A or AAA).
-
Repeat the procedures to add the following hosts.

-
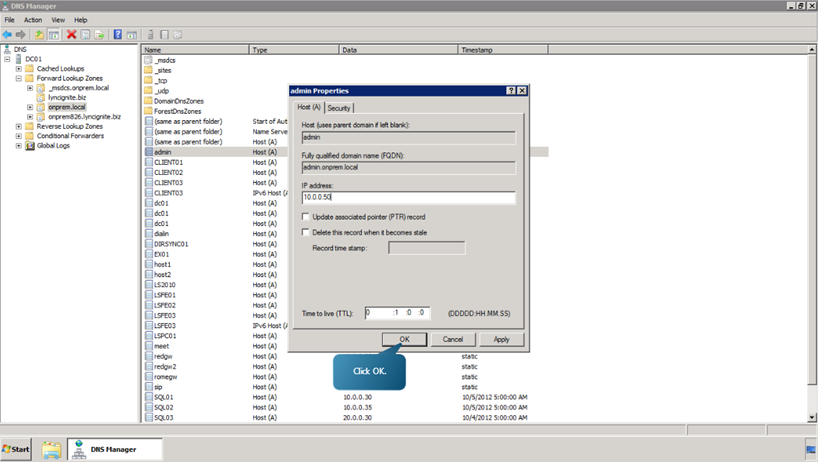
Next, edit and create the Redmond and Rome pool DNS records. To do that, select onprem.local right click on admin and select Properties. Specify the IP Address as 10.0.0.50 and
click OK.
- In the forward lookup zones tab, right click on onprem.local. Select New Host (A or AAA).
-
Add the following hosts.


Now, we will see how to create the Service (SRV) records necessary for automatic client sign-in.
-
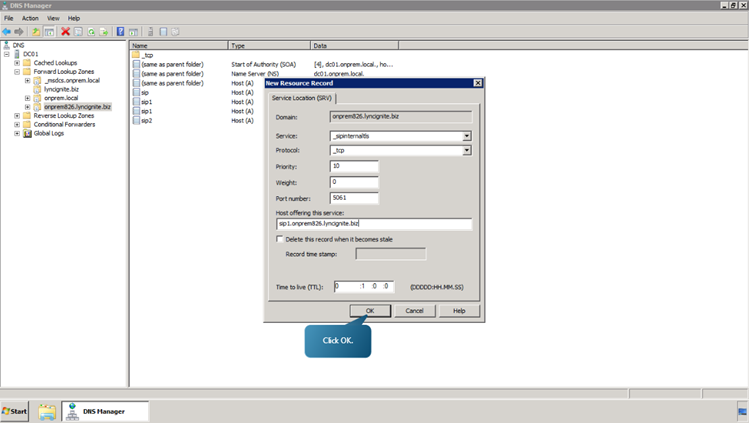
Right click on onprem826.lyncignite.biz. Select other New Records. Select Service Location (SRV). And click on create Record button. Enter the DNS A record we created for the Redmond site. i.e the Host is to be specified
as sip1.onprem826.lyncignite.biz.

-
Now click on create record once again and specify the second host.
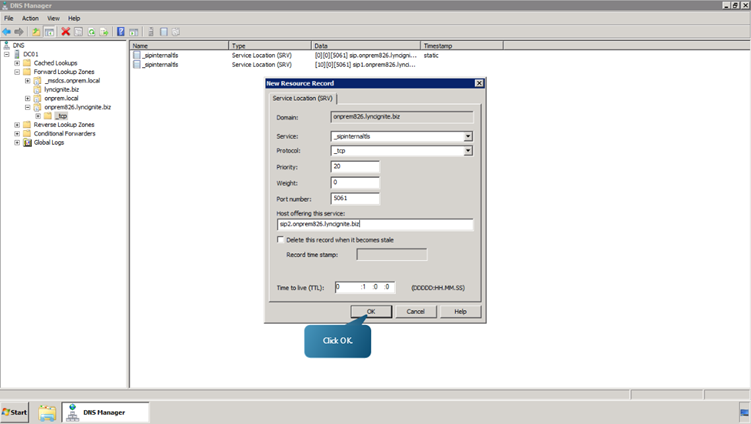
- Click Done.
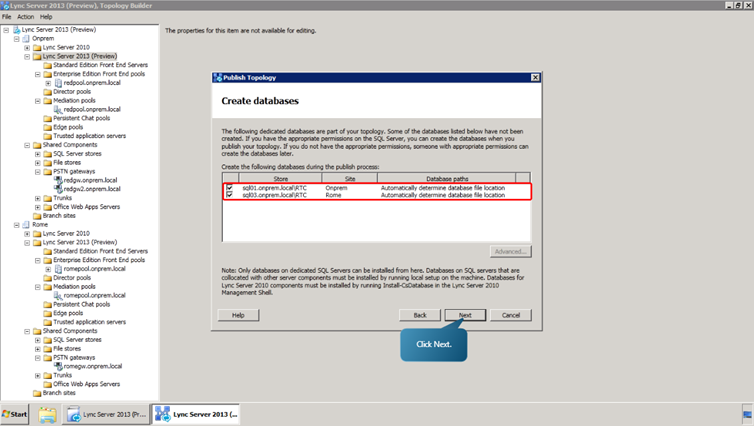
Next, switching to Topology Builder on the first Front End Server now associated with the Redmond site, lets publish the topology to a database in the Central Management Store (CMS).
- Right click on the Lync Server 2013 (Preview) tab, select Topology -> Publish.
-
Click Next. Make sure that Both records are present, and click Next.
-
Next, select the Click here to open to do list link. Review the file and the instructions to run local setup on each server in the list. Then, close Notepad.
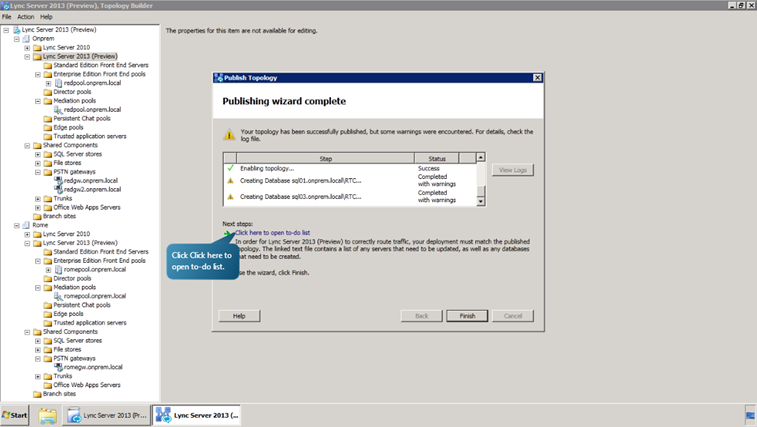
- Finish the Publish Topology Wizard and close Topology Builder
-
Right click on onprem826.lyncignite.biz. Select other New Records. Select Service Location (SRV). And click on create Record button. Enter the DNS A record we created for the Redmond site. i.e the Host is to be specified
as sip1.onprem826.lyncignite.biz.
Abdi.Mreza@gmail.com
Abdi.Mreza@live.com
mr_abdi@li


